The ZigZag indicator is a technical analysis tool. It is difficult to build an independent strategy on it, but with its help you can quickly identify trend lines on the chart and form support and resistance levels. The main advantage of ZigZag is that it helps clear the chart of noise.
Description of the ZigZag indicator
In the MetaTrader trading terminal, the ZigZag (ZZ) indicator is located in a set of built-in technical tools. It should be taken into account that this is the simplest standard version of the indicator, which has minimal functionality. There are developments of other modified ZigZag (ZZ) indicators, individual representatives of which will be described in the corresponding section.
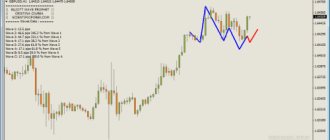
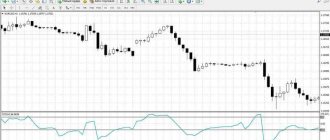
Figure 1. Broken curve of the non-redrawing ZigZag indicator.
After installation on the price chart (this is done by simply dragging its name from the list of indicators onto the price chart), ZZ draws a continuous broken curve on it, consisting of segments (Fig. 1). The end of the previous segment is the beginning of the next one.
It is easy to see that the place where the segments connect is the price minimum or maximum for a certain time period. Therefore, with the help of 3D, local extremes can be easily identified, which can be used for various purposes in a variety of trading strategies (for example, to identify resistance and support levels, supply and demand zones, etc.).
One of the basic tasks of this indicator is to identify true market movements and ignore noise. The former, as a rule, have a large amplitude, while the latter have a small amplitude. Therefore, ZZ can be called a filter that separates market noise from significant price dynamics.
Use, conclusions
In the future, I plan to show a couple of approaches on how to combine this tool with other analysis methods. And now I would like to move on to conclusions.
We can conclude. What Zigzag is for Quik, which you can get from this page, is an indicator that differs from its counterpart for MT4 in appearance and in the way it is configured to work. However, the tool is easily recognizable and easy to install. So even if no one needs all its arrows and additional formations, you can still use it as an auxiliary tool.
The topic of today's publication is the QLUA scripting language. QLUA is a powerful tool for writing trading robots. And today we will discuss its pros and cons. Let's see how to write a simple indicator and the first robot on it. At the beginning of my journey, I spent a long time choosing a development environment, looking for an effective and at the same time simple solution for writing trading robots and advisors. This path took several years, and I didn’t try anything at that time. Excel, Metastock, TsLab. But in the end I settled on QLua, rightly deciding that this was what I needed.
1) Why choose QLua.
2) A little history and about the advantages of QLua in comparison with its predecessor QPile.
3) Writing indicators in QLua.
4) Writing a robot in QLua using Quik
5) Conclusion
1. Why choose QLua.
I will try to briefly describe the pros and cons. It’s worth starting with the fact that within the Russian Federation, the most common terminal for trading stocks and futures is Quik. If we start from the fact that our terminal is Quik, then the choice will be between: programs for testing, high-level languages and built-in languages in the terminal Qlua, QPile.
When compared with systems where the algorithm is built by constructing flowcharts, the advantage of Qlua is that there is no fee for using the trading system as in TsLab and there is no need to use additional ones. “gaskets” like Wealth-lab. In block building systems such as: TsLab, Wealth-lab, etc. It is problematic to build complex systems, and to reduce the number of blocks and obtain additional. functions require knowledge of high-level languages such as: C#, Pascal to write cubes manually.
If we consider writing robots in languages such as C#, Delphi, then the clear disadvantage is the complexity of writing code and its size to create a simple robot. Scripting languages QLua or Qpile allow you to implement an idea in a shorter time.
Scripting language (script language, slang scripting language, from the English scripting language) is a high-level script language (English script) - brief descriptions of actions performed by the system. A script is a program that deals with ready-made software components, which greatly simplifies the writing of trading robot code. That is, to obtain data on the closing value of a candle, it is enough to write a line of code like: ds:C(20) all, and we get the closing value of the twentieth candle of the instrument. There is no need to write “kilometers” of code. At the same time, all the functionality is available as in a full-fledged programming language.
Among the disadvantages, it can be noted that QLua is used only within the Quik terminal and this language is not available for working with other terminals and trading systems. Also considering that Quik is only a terminal and does not allow testing of trading algorithms. QLua does not have a simple solution for testing robots, as can be done within platforms such as TsLab and Wealth-Lab.
2. A little history and the advantages of QLua in comparison with its predecessor QPile.
Before QLua there was QPile, and in general it still exists. The QPile scripting language interpreter was developed by ARQA Technologies in 2002. and developed until 2012, later a Lua interpreter was added to the Quik terminal. There is also a possibility that ARQA Technologies may in the near future abandon further support for QPile. Qpile, like Qlua, is a scripting language and has a number of capabilities. It is rightfully the first language for writing robots and advisors for the Quik terminal. It is an easy to learn and functional tool, but has a number of disadvantages.
And so, what are the advantages of QLua in comparison with QPile:
QLua does not have a delay of 1 second for processing the robot’s trading logic. This, of course, is not critical for medium-term strategies, but for writing scalping robots it can become critical.
QLua has multithreading. This is implemented in the form of the main flow of trading logic and callback functions.
It is possible to write and connect libraries in other languages; Lua itself, by the way, is written in C
It is now possible to write custom indicators and use them as standard ones.
The syntax of the language is a bit similar to JavaScript and C#, hence the convenience of working with variable operators, etc.
Scripts are usually interpreted rather than compiled. QLua has JIT compilers because it is based on the Lua language. This allows you to hide the source code, while with Qpile it is always open. Link as a compiler to hide Qlua source code
3. Writing indicators in QLua.
(1) Custom indicator
As mentioned above, within the Quik terminal there are two scripting languages: Qpile and QLua. Qpile is an earlier language that appeared in Quik and it was not possible to write indicators in it. Later, the developers expanded the functionality and added QLua, within which it became possible to write indicators. In this part of the article we will talk about creating an indicator for Quik.
A QLua indicator is a file with the *.lua or *.luac extension and is visually no different from a robot. The exception is its location. In order for Quik to see the indicator, it must be placed in the LuaIndicators folder. The LuaIndicators folder should be stored in the root of the Kwik folder; if it is not there, then it must be created. In order to quickly open the Kwik folder, you need to right-click on its shortcut on the desktop and select “File location”.
And so let's move on to creating an indicator. For this we need any text editor like Notepad.
The QLua indicator for Quik consists of three main parts.
The first part is the declaration and filling of the global Settings array, which contains indicator parameter variables, line type for display, thickness, color. The Settings array contains user variables for changing indicator parameters from the Kwik user interface.
The second part is the Init function; it runs once when the indicator is initialized. Returns the number of indicator lines.
The third part of the OnCalculate(index) function receives the candle number as input. It is launched by the interpreter as many times as there are candles on the chart and returns the numerical value of the indicator. If there are several lines in the indicator, then there are several numerical values. To make the code easier to understand, there will be comments. To comment a line in QLua, use “—”. All content after two hyphens is not perceived by the QLua code interpreter.
—[[ Multi-line comments are located between the characters of two hyphens and square brackets ]]— Settings= { Name = “Channel”, — indicator name period=5, — indicator parameter line= { { Name = “High”, Type =TYPE_LINE, Width = 1, Color = RGB(120,90, 140) }, { Name = "Low", Type =TYPE_LINE, Width = 1, Color = RGB(120,90,140) } } }
Here we have described an array of settings, entered the name of the indicator, the parameters described the parameters of the two lines of the indicator. These parameters will be available in the custom indicator for changing when loading the indicator on Qlua in Quik
- (1)Indicator name
- (2) Setting the period variable
- (3)Set the default color for the High line
- (4)The name of the indicator line, which we wrote in the “line” cell of our settings sheet
- (5) The line type we set to use as default Type =TYPE_LINE
- (6)Indicator line thickness Width = 1
function Init() return 2 end - we will display two lines on the chart -[[ In the OnCalculate function we will calculate the Price Channel indicator - these are two lines constructed from the extreme values of candlesticks for a certain number of bars.
That is, the first value that we will calculate is the maximum value for the period, in our case it is equal to five, and the second value that the function will return is the minimum value for the period. So let's start the calculation. ]]— function OnCalculate(index) local high=0 local low=0 Period = math.floor(Settings.period) if indexhigh then high=H(i) end if low>L(i) then low=L(i) end end else high=H(index) low=L(index) for i=index , (index+1)-Period , -1 do if H(i)>high then high=H(i) end if low>L (i) then low=L(i) end end end return high , low end We create a file with the lua extension in the editor, write the code into it and save it in the LuaIndicators folder, after that we will have a new indicator and we can add it to ours to the chart as a standard Quik indicator (1)
4. Writing a robot in QLua using Quik
Writing a trading robot in QLua is done in a regular text editor, just like writing an indicator. The difference will be in the structure of the code and in the fact that you can place the robot in any place convenient for you on the computer. In a robot, only one main function is required.
And so let's get started. Let's write a robot with a simple algorithm. We will calculate the moving average inside the robot and make a decision to buy/sell one lot for an instrument based on the amount in the client’s portfolio when the last bar closes below/above the average value calculated at the close of the instrument’s minute bars. That is, when the close bar crosses the average bar from bottom to top, we will check the number of contracts in the portfolio for the instrument, and if it is less than one, then we will buy the difference up to one long contract. The opposite situation occurs when the close crosses the closed bar of the average value from top to bottom. We will send a transaction to receive one short lot in the client’s portfolio.
Variable for jumping the cycle when the OnStop callback function is triggered is_run = true - assigning initial basic values of the trading algorithm to variables - trading account Class_Code = "QJSIM" - class of the instrument being traded Sec_Code = "SBER" - code of the instrument being traded TF = INTERVAL_M1 - trading timeframe g_lots = 1 - number of traded lots function main() - subscribe to receive candle data for the instrument in the ds array ds = CreateDataSource(Class_Code, Sec_Code, TF) while is_run do sleep(1000) - process the cycle with a delay of 1 second. ds:SetEmptyCallback() - update the instrument data in the ds array local serv_time=tonumber(timeformat(getInfoParam("SERVERTIME"))) - placed in the server time variable in HHMMSS format if isConnected()==1 and serv_time>=10000 and serv_time20 then local sum = 0 for i=0 , period-1 do sum = sum + ds:C(count_candle-i) end SMA = sum / period local lots = get_lots() — getting the number of lots in the client portfolio by instrument if ds :C(count_candle)>SMA and lots(g_lots*(-1)) then — getting the minimum price step to organize the slippage value in the order local step=tonumber(getParamEx(Class_Code, Sec_Code, “SEC_PRICE_STEP”).param_value) local price_order = ds:C(count_candle)-(step*20) - the price for the order will be = closing price - 20 minimum steps inst. send_order("S", math.abs(g_lots+lots) , price_order) end end end end end - the function returns the number of lots in the client portfolio for a given instrument function get_lots() local lots = 0 local n = getNumberOf("futures_client_holding") local futures_client_holding={} for i=0,n-1 do futures_client_holding = getItem("futures_client_holding", i) if tostring(futures_client_holding["sec_code"])==Sec_Code then lots=tonumber(futures_client_holding["totalnet"]) end end return lots end ———————- — sending a transaction function send_order(operation, quantity, price) — getting the minimum price step for rounding the price of the sent order local step=tonumber(getParamEx(Class_Code, Sec_Code, “SEC_PRICE_STEP”). param_value) local trans_params = { CLIENT_CODE = Account, CLASSCODE = Class_Code, SECCODE = Sec_Code, ACCOUNT = Account, TYPE = "L", TRANS_ID = tostring(1), OPERATION = tostring(operation), QUANTITY = tostring(math.abs( quantity)), PRICE = tostring(math.floor(tonumber(price)/step)*step), — price rounding when sending a transaction ACTION = “NEW_ORDER” } local res = sendTransaction(trans_params) if string.len(res) ~ = 0 then message("Error: "..res,3) return 0 else return trans_id end end function OnStop(stop_flag) is_run=false stop_flag=1 ds:Close() end function timeformat(time_unf) local in1, in2=0 ,0 local time_form=0 in1=string.find(time_unf,»:» , 0) if in1~=nil and in1~=0 then in2=string.find(time_unf,»:» , in1+1) time_form=string .sub(time_unf, 0 ,in1-1)..string.sub(time_unf, in1+1 ,in2-1)..string.sub(time_unf, in2+1 ,string.len(time_unf)) end return time_form end
After editing the code, we save it in a convenient place for you with the lua extension. To start the robot you need to go to Services -> Lua scripts
- (1)Add the script from the saved location
- (2) We check its appearance in the table of running scripts; after launch, a green arrow will appear indicating the script is running
- (3) Let's put it to work
- (4) Check the field for errors during operation
5. Conclusion
To summarize, I would like to say that if the Quik terminal is used for trading, then one of the easiest ways to write automated trading systems is the QLua scripting language. And I hope that today you are convinced of this for yourself.
As part of the trading robot written as an example above, we received a ready-made mechanical trading system in one hundred lines of code. Which is a very good result.
For writing indicators in Kwik, Qlua is the only possible option.
In general, trade with algorithms. Use good technology!
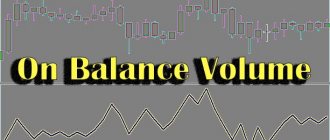
Good afternoon, dear readers and guests of the Webmastermaxim.ru blog. Today we will talk about how to add an indicator to a chart in Quik. The fact is that not so long ago, we discussed the Zigzag indicator, then I used it under the chart. But in Quik it is possible to install the indicator in Quik directly on the chart, which makes working with this indicator much easier.
I have already noted that Zigzag is an auxiliary indicator that will help you learn how to identify key tops and bottoms. Below I will provide links to articles that talk about this in detail.
ZigZag indicator parameters
Immediately after installing the ZZ, a setting window is displayed on the price chart (Fig. 2). In it you can set the color, width and style of the drawn line, the time frames on which it will be displayed, as well as the following parameters that affect the results of extreme point calculations:
- Depth – the minimum number of candles between adjacent identical extremes (minimums or maximums);
- Deviation – the minimum relative difference between the High or Low prices of neighboring extremum candles;
- Backstep – the minimum number of candles between adjacent opposite extremes (minimum and maximum).
Figure 2. Input parameters of the indicator settings window without delay and redrawing of ZigZag.
How to set up the ZigZag indicator
The Deviation value determines the price sensitivity of the indicator's computational algorithm. It is set as a percentage (relative to the number of points of price movement from the previous extreme) and if the High price of the current candle is lower than the High price of the previous candle by an amount less than Deviation, then the High price of the current candle is not considered the maximum. Accordingly, the Low price of a candle is not considered a minimum if it is higher than the Low price of the previous candle by less than the Deviation value.
The Depth value determines the number of candles that must pass after the formed extremum, after which the algorithm begins searching for the next similar extremum. This variable ensures that the ZigZag indicator does not redraw, since during the Depth of candles the next extremum cannot be formed, the same as the previous one (maximum after a maximum or minimum after a minimum).
The Backstep value determines how many candles later the search for the opposite extremum begins (after the minimum - the maximum, and after the maximum - the minimum). In other words, adjacent opposite extrema cannot be closer to each other than Backstep.
The color, width and style of the line allow you to set a unique display of the 33 line on the price chart. These parameters will be useful when trading based on the analysis of signals from several indicators.
You can also set all or only some timeframes on which the ZZ line will be displayed. This may be required in trading strategies based on analysis of the price dynamics of one financial instrument on different time frames (for example, ZigZag can determine the trend on a higher time frame, and on a junior time frame it can search for moments to enter the market using other instruments).
The values of all the listed variables are set in accordance with the tasks facing the trader and the trading strategy he uses. For example, when scalping trading, it is necessary to monitor price fluctuations that have a minimum amplitude and occur over short time periods. Therefore, the values of all variables should be as small as possible. And if a trader trades using long- and medium-term strategies, then the values of the variables should be large, which makes it possible to effectively filter out random price movements and highlight exclusively global dynamics.
Figure 3. This is how a non-redrawing ZigZag is displayed without redrawing with different parameters.
The standard set of ZZ parameters is 12 (Depth), 5 (Deviation), 3 (Backstep). In Fig. 3 ZigZag with standard parameters is drawn in red. For comparison, the ZZ is drawn in yellow with parameters increased by 3 times - 36 (Depth), 15 (Deviation), 9 (Backstep).
How is the ZigZag indicator calculated?
In a simplified form, the calculation of the 3Z algorithm is performed as follows. Initially, the minimum and maximum are assumed to be equal (fixed), respectively, to the Low and High prices of the first candle of the analyzed period (available price history on the current timeframe). Then there is a sequential comparison of High candles with a fixed maximum and Low candles with a fixed minimum;
- if the High price of the current analyzed candle is not higher than the recorded maximum, then the check of the next candle begins, otherwise the High price of the current analyzed candle becomes the maximum;
- if the Low price of the current analyzed candle is not lower than the fixed minimum, then the check of the next candle begins, otherwise the minimum becomes the Low price of the current analyzed candle.
If during a time period that satisfies the Backstep and Depth parameters, the minimum or maximum has not been updated in accordance with the Deviation parameter, then it is displayed on the chart as an extremum point and the algorithm begins searching for the opposite extremum. Each subsequent found extremum that satisfies the conditions specified in the ZZ settings is connected to the previous segment.
How to work with the ZigZag indicator
One of the most common ways to use 3D is to build resistance levels (RL) and support levels (SS):
- resistance is built at maximums (Fig. 4);
- support is based on minimums (Fig. 5).
In this case, it is necessary to identify the most significant key levels that can stop and reverse price dynamics.
ZZ can also be used to identify zones of demand (DS) and supply (ZP), which have a very strong similarity with UP and SS. The main difference between them is the strength:
- the strength of UE and US is directly proportional to the number of tests;
- the strength of the GS and GP decreases with each successive testing.
Figure 4. Resistance level (red line), built on the maximum of the ZigZag indicator, marked with a red arrow, which was subsequently tested, but not broken (green arrow).
Figure 5. Support level (red line), built on the minimum of the ZigZag indicator (marked with a red arrow), subsequently tested twice and not broken (green arrows).
It is very convenient to use the ZigZag polyline to draw a trend line:
- with a downward trend - according to the maxima, successively decreasing (Fig. 6);
- with an upward trend - according to minimums that consistently increase (Fig. 7).
Figure 6. Downtrend line drawn from successively decreasing price highs.
Figure 7. Uptrend line, for construction of which the minimums identified by the ZigZag indicator were used.
Another common way to use ZZ is to identify graphic figures (patterns). For example, in Fig. Figure 8 shows the ABC pattern. A long position on it is opened after the price after point C crosses the level of point B from the bottom up. Stop Loss is set at the level of point C, and the Take Profit size is selected 2–3 times larger than Stop Loss.
Figure 8. ABC pattern built on two lows and one high, identified by the ZigZag indicator.
ZigZag trading strategies
As a rule, TS involve analyzing two or more technical instruments and opening positions based on its results. However, you can also trade based on ZZ signals only. One of these techniques is as follows (Fig. 9):
- when a minimum is formed, a long position is opened with a Stop Loss below this minimum;
- when a maximum is formed, a short position is opened with a Stop Loss above this maximum.
Figure 9. Trading strategy for one ZigZag indicator.
The Stop Loss size is selected based on the volatility of the financial instrument being traded. Open trades are closed after the formation of the next opposite extremum or by setting a Take Profit 2÷3 times higher than the Stop Loss (in this case, you should analyze the probability of achieving such a Take Profit, and if it is small, then it is better not to execute the transaction).
The described strategy works to rebound from levels. The following strategy works to break through levels. If a maximum has formed, then you need to wait until the price moves down from it to such a distance that it is possible to set BuyStop at the maximum level with a minimum Stop Loss (Fig. 10). If a minimum has formed, then you need to wait until the price moves up from it to a distance at which you can place a SellStop at the minimum level with a minimum Stop Loss.
Figure 10. Trading for a breakdown of levels identified by the ZigZag indicator.
As a result, the trader constantly has 2 pending orders activated at the last two extremes. The Take Profit of transactions is set several times larger than the Stop Loss size.
ZigZag indicator for scalping
The TS described in this section involves the use of two more technical tools in addition to ZZ:
- SuperSignalsChannel – a modified “Price Channel” that draws green and red lines between which the price moves, and arrows when the price touches these lines;
- FT PVD – draws a strip of red and blue bars on the price chart, indicating the current trend (red bars - downward, blue bars - upward).
A ready-made template for this scalping trading strategy can be downloaded here. The archive contains a set of indicators (.ex4 and .mq4 files) placed in the Indicators folder, and a template file (.tpl) placed in the Templates folder).
A long position is opened if (Fig. 11):
- SuperSignalsChannel displays a green arrow;
- the previous found extremum ZZ is the maximum;
- FT PVD displays blue bars.
Figure 11. Buying an asset using a scalping trading strategy using the ZigZag indicator.
A short position is opened if (Fig. 12):
- SuperSignalsChannel displays a red arrow;
- the previous found extremum ZZ is the minimum;
- FT PVD displays red bars.
Figure 12. Selling an asset using a scalping vehicle using the ZigZag indicator.
Stop Loss is placed several pips above the nearest high (for a short position) or below the nearest low (for a long position). Profit is fixed when the SuperSignalsChannel generates an arrow of the opposite color than when opening a position.
Installation, configuration
To install, unzip the file to your terminal folder. There you need to create a LuaIndicators folder. For example, the file path could be C:\FinamJunior\LuaIndicators. Next, install the indicator. Right-click on the chart “Add...” or the Insert button. Then continue as usual.
Download
We proceed to editing in the same way. There are only two settings:
- ddd is the Zigzag period. If you increase its values, the tool will become smoother. If you reduce it, small irregularities in the graph will be reflected on the instrument line.
- Period ATR is the period of the auxiliary line on the chart, which the creators apparently propose to use as a signal line.
You can also see blue and red arrows on the tool. I won’t explain how to use them, everything is already clear. I can only say once again that Zigzag itself is used only as an auxiliary tool, for example, for working with the Elliott wave theory.
Watch a video review about the indicator
Other articles on this topic:
Modified ZigZag indicators
Since the standard version of ZZ, built into MT, has minimal functionality (it only determines minimums and maximums and connects them with segments), traders made all sorts of additions and changes to the indicator code. The result was modified versions that expanded the possibilities of their use in trade. Some of them can improve the convenience of the trading process, while others provide auxiliary functions. Some such modified ZZs are described below.
ZigZag Alert indicator (download)
The simplest option for modifying the ZZ is to introduce a code into its algorithm, the functions of which are to notify the trader about the formation of a new extremum. Such a notification can be visual (arrow on the graph, Fig. 13), audio or text (message in a pop-up window, SMS to a phone, letter to a virtual mailbox).
Figure 13. Visual arrow alert signals of the ZigZag Alert indicator.
Generating alerts increases the convenience of trading, allowing the trader not to observe price movements, but to focus on analyzing other market information aimed at making a profit (or eliminating losses). In this case, the trader returns to the chart of the financial instrument that he prefers to trade when he receives a signal about the formation of the next extremum, identification of which is the purpose of the 3D operation.
In the simplest case, arrows are used to open positions:
- along the green one, pointing up - long;
- along the red one pointing down - short.
In this case, it is necessary to use an auxiliary filter (for example, a trend indicator).
It is worth noting the difference in the parameters of ZigZag Alert from regular ZZ. In it, only two of them affect the results of algorithmic calculations:
- NoiseLevel – degree of filtering of random price fluctuations;
- SwitchPercent – the relative value of the price movement at which a reversal will be identified.
You can read more about ZigZag Alert here.
ZigZag MTF indicator (download)
This multi-timeframe modification ensures the display of several curves on one chart (Fig. 14), corresponding to the calculation of the algorithm on several timeframes. This allows you to see the most significant extremes - two or more curves corresponding to different time frames converge at them.
Figure 14. Several curves displaying the results of calculating the ZigZag MTF indicator on several consecutive timeframes.
In the settings, the trader can set the timeframes on which the ZigZag is calculated. Most often, 3 consecutive timeframes are selected. In this case, as a junior timeframe, it is advisable to choose the period of the working chart on which the trader carries out the main analysis of the market.
You can display the usual ZigZag indicator (you can download its basic version from here if necessary) on one chart of several curves corresponding to different timeframes. To do this, change the Depth and Backstep parameters proportionally. For example, if on a chart with TF M15 it is necessary to display ZZ for TF H4, then the indicated 2 parameters are increased by 16 times. And the Deviation parameter is set in accordance with the volatility of the financial instrument on TF H4.
Check out Quik
Today I want to draw your attention to the fact that in the terminal for the stock market and others - Quik, it is possible to place an indicator directly on the asset chart. This makes working with it much easier. Makes it more visual. And combining the peaks of the chart and indicator no longer requires much effort.
Other articles about Zigzag:
It's very easy to do! Via the checkmark that is added when you set the tool to On in Quik. After this, you just need to apply the settings and this will be enough to get started. The indicator not only does not lose its properties, but working with it can become more convenient. I believe that you will come across indicators that look better on the chart than below it.
Watch a video about Quik rules
A good example of this application is the Parabolic SAR indicator in Quik. Yes, we are used to seeing it on the chart, but in Quik it is continuous. I mean there are absolutely no rips on it. This makes it look a little dirty when added to the chart. Whereas under the graph, with a little skill, it looks very convincing! I imagine it will take a little time to practice using it this way in Quik. In short, when there is a jump down and then a gentle rise, this is a buy signal, and a jump up and a gentle decline is a sell signal. However, remember that this one added or installed indicator will not give a good result in the long term.
Don't forget that indicators are just an auxiliary system that will help you learn a little more about the properties of the chart. But using them for forecasting is quite difficult.